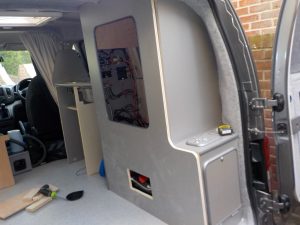
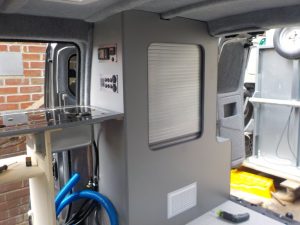
Today I finished one of my most feared jobs. Whilst I can blag and bodge most things, and cover over most cock ups, doing the furniture is a bit final. They are on view, and need to be good. The problem is, I’m crap at woodwork, don’t have the patience to do things accurately, and I’m hardly Mr Neat.
The wardrobe is a large panel, floor to ceiling, around roof beams, door beam, and as ever nothing is level.
Anyway the centre bulkhead was already in place as was the rear, so getting the wardrobe panel to fit perfectly was a challenge. The bulkhead 90′ to floor (as if it was it looks wonky) – so its a bit of a mare! And the bed had to be removed to get the panel in.
And you know I keep going on about how tight the design is, well, the bed clears wall and the wardrobe by 1-2mm each side, and the batteries only just fit, and the battery vent tubes don’t fit and have to hide in the cut out for the air vent! And you know I say accuracy isn’t my thing…..
And I do have all the tools, but no training, so whilst I have a router I’ve only watch a few youtube clips and made a really dire draw unit for my workshop. (And the router is going back as its bust already).
Anyway, excuses over…
The wardrobe front is screwed to both bulkheads and the floor with pocket hole screws, and also screwed in tight to the gas locker. We marked a buldline on the floor so all fitted well. Its t-edged top and right, and on the left butts up to the middle bulkhead. The right side is wrapped around the gas locker giving a nice shape which will marry up with the kitchen bit (watch this space)
There is just one large tambour door for access. The electrics are boxed in with removable panels (and fuse boxes easy access), and inside will be shelved (not complete). There is one big shelf at the bottom covering up batteries and pump that hinges up for easy access.
That’s about it – came out exactly as I hoped and better than expected!


Hi, did you just paint the plywood silver? Thank you
No – it is special lightweight ply which is coated. MUCH straighter than normal ply and about 1/2 the weight. Expensive though – £45-50 for 8×4 sheet of plain stuff I used for non visible areas, and £120+ for the finished stuff. Has a very fine layer of covering.
Available from specialist suppliers in self-build parts.
Hi mate do you have the measurements for the wardrobe and sink units I’m having my hair rock and roll bed made by a company in Birmingham and would really appreciate the information on the wardrobes I’ve been following your build for the last 6 months trying to get my head round the way you did it and I’m loving the way that you detailed everything in your website absolutely awesome well done mate so envious!
Oh and I’ve got an NV200 exactly the same as yours even to the colour that’s if you still have it as I see that you was going to be getting a large vehicle anyway take care and thanks for the inspiration
Hi
Yep, still have it, and still using it to the max. Van#2 is (probably) a 2020 project….
If you are ever in Wiltshire happy for guided tours. The NV is very very tight as you know, so sizing is a compromise. My sink is a CAN FL1401 I think so google that for exact dimensions. The bed frame is 100cm wide, and there is mm clearance between that and the wardrobe and that and the nearside wall. My dimensions of wardrobe may not help as it depends on what you have on either side and how you’ve lined – e.g. if I say 400mm deep, you may only have 380 if you lined it differently…..
Happy to answer anything specific – but bear in mind the answer may be correct for me, and wrong for you (trying to be helpful lol – though it reads bad!)
Haha no that’s fine mate any help I can get is a bonus as I’m a total novice in this field I’ve been looking at a company called Conwy campers who do the complete build for £6,000 and I can’t justify paying that and that’s why I’m at this stage right now I would be very interested to know how much the camper conversion cost you just for comparisons sake I actually think that given the van is exactly the same as your own I’m going to follow your build to every detail believe it or not even to the lining so I need any info on the lining would be massively appreciated Ryan..👍